A plush toy is never just “made.”
It is engineered through a chain of decisions: how the material is approved, how the pattern is cut, how the features are applied, how the body is sewn, how the filling is distributed, and how the finished unit is checked before shipment. Manufacturing guides aimed at production buyers consistently describe the workflow as material preparation, cutting, component processing, sewing, stuffing, shaping, QC, needle detection, and packaging. For export projects, those steps are not only about appearance — they also shape consistency, lead time, and compliance readiness.
Why this guide matters to buyers and product managers
Most sourcing mistakes happen because buyers compare plush toys at the wrong level. They compare the quote, the sample photo, or the outside fabric, but not the process route behind the product. That is risky, because the sample stage is where the design is translated into a physical product and where teams are supposed to test proportions, materials, embroidery or printing accuracy, stuffing, softness, and durability before mass production begins. A final approved sample then becomes the golden sample for bulk production. If this stage is weak, the bulk order usually drifts.
Step 1: Sampling is where the plush toy becomes real
Before a factory ever starts bulk production, the prototype stage is where a 2D concept becomes a 3D production-ready plush. Industry sample-stage guides note that manufacturers map fabric cuts, embroidery positions, seam placements, and filling amounts during prototyping, then use the prototype to check shape, color, softness, stitching, and accessory fit. In practice, this means the sample stage is not just for “approval” — it is the moment where you lock the visual language and the manufacturing logic of the product.
For B2B teams, this is where internal disagreements should be settled. If branding wants cleaner logo detail, product wants a softer hand feel, and sourcing wants lower cost, the sample stage is where those trade-offs become visible. Once the prototype is approved and treated as the reference standard, the factory can scale with fewer surprises. If the sample is approved too early, bulk quality problems often show up later as “factory inconsistency,” when the real problem was incomplete engineering at the start.
Step 2: Material preparation is the quiet stage that decides bulk consistency
A lot of buyers focus on decoration or sewing, but plush factories start with raw-material control for a reason. According to manufacturing process guides, factories match production materials against approved swatches and the pre-production sample, then check fabric texture, softness, color, pile height, density, and durability before cutting. Incoming quality inspection is used to look for color variation, shading differences, backing stability, dye consistency, defects, or contamination, and plush fabrics are often relaxed before cutting to prevent distortion.
This is one of the most underestimated parts of plush development. If the fabric batch is unstable, the toy may already be “wrong” before sewing begins. If dye lots are inconsistent, faces and limbs may not match visually. If the backing is unstable, seam behavior changes. Material preparation is also where factories connect the product to market requirements by screening for safety and attachment issues before assembly. That is why experienced buyers do not just approve a fabric name; they approve a material standard.
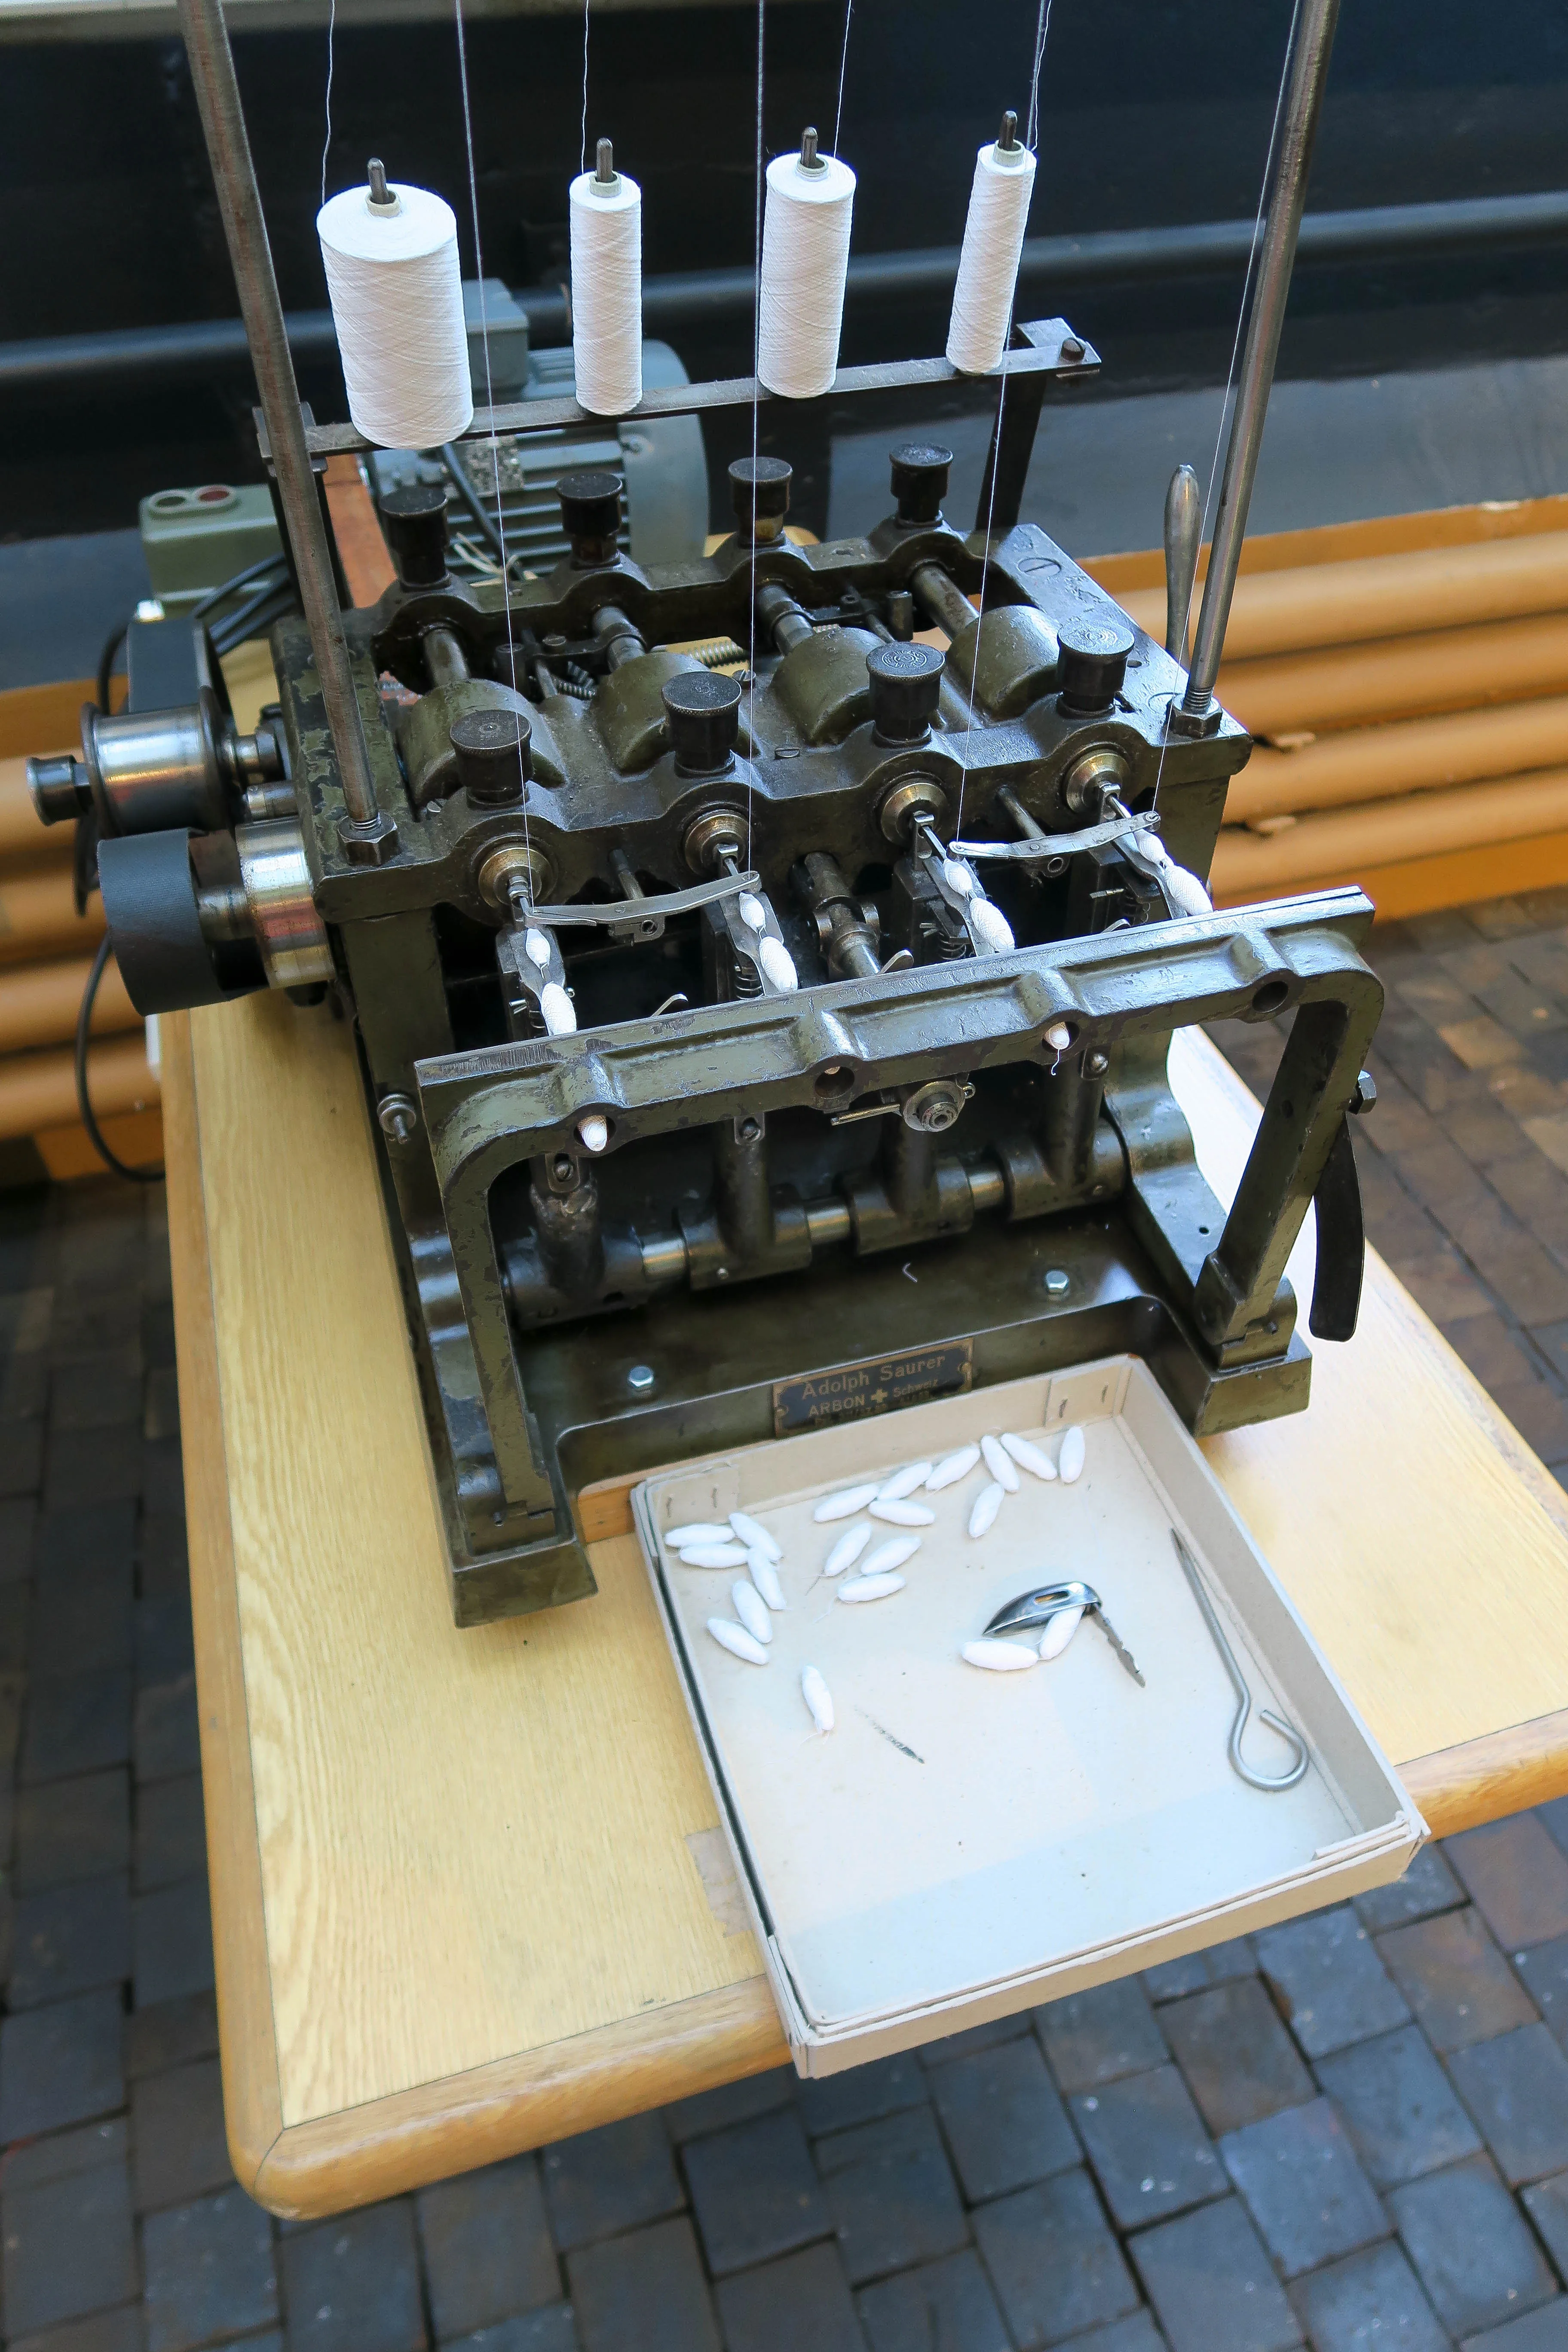
Step 3: Cutting is not just cutting — it controls symmetry, shading, and repeatability
Once the material passes inspection, the factory moves into cutting. Process guides describe this as one of the most technically sensitive stages because cutting accuracy directly affects a plush toy’s shape, symmetry, and proportion. Factories commonly use a mix of manual cutting, die-cutting, and computer-controlled cutting depending on design complexity and order volume. Plush fabrics also require consistent control of pile direction because grain direction changes the visual finish and can create shading differences if panels are cut inconsistently.
This is where a useful B2B comparison starts:
- Manual cutting is usually more flexible for early-stage prototypes, low volumes, or irregular shapes that still need adjustment.
- Die-cutting works well when repeatable small parts need speed and efficiency.
- Computer-controlled cutting is better suited to large-volume consistency and material efficiency.
That does not mean one method is universally “best.” It means the right cutting method depends on whether your priority is flexibility, throughput, or scale consistency. For buyers, the key question is not “Do you cut by hand or machine?” It is “Which cutting route fits this SKU and this order size?”
Step 4: Decoration method changes both the look and the commercial positioning
Before assembly, facial expressions, logos, graphics, and other visual details are usually applied to individual components. Plush manufacturing guides note that embroidery is done from digitized files and helps keep position, stitch count, thickness, and color consistent, while printing methods such as heat transfer, sublimation, or screen printing are selected based on fabric type and the level of visual detail required.
This becomes one of the most important horizontal comparisons in plush development:

Embroidery
Embroidery is the stronger option when you need crisp edges, raised texture, simple facial features, or corporate logos. Factory-oriented B2B guides describe it as the better choice for solid-color shapes, simple expressions, and detail that needs a premium, tactile feel. It also supports stronger repeatability for clearly defined graphic elements.
Sublimation or other printing methods
Printing is the better choice when you need gradients, highly detailed illustrations, anime-style eyes, or complex multi-color artwork. Supplier guides note that sublimation can create high-detail visuals without adding surface texture, but it works under stricter material constraints and typically requires 100% polyester fabrics to achieve the intended result.
The practical takeaway is simple: embroidery and printing are not substitutes; they solve different visual problems. If a buyer asks for “the cheaper option” without clarifying the visual goal, the final plush often loses the very quality signal the product needed.
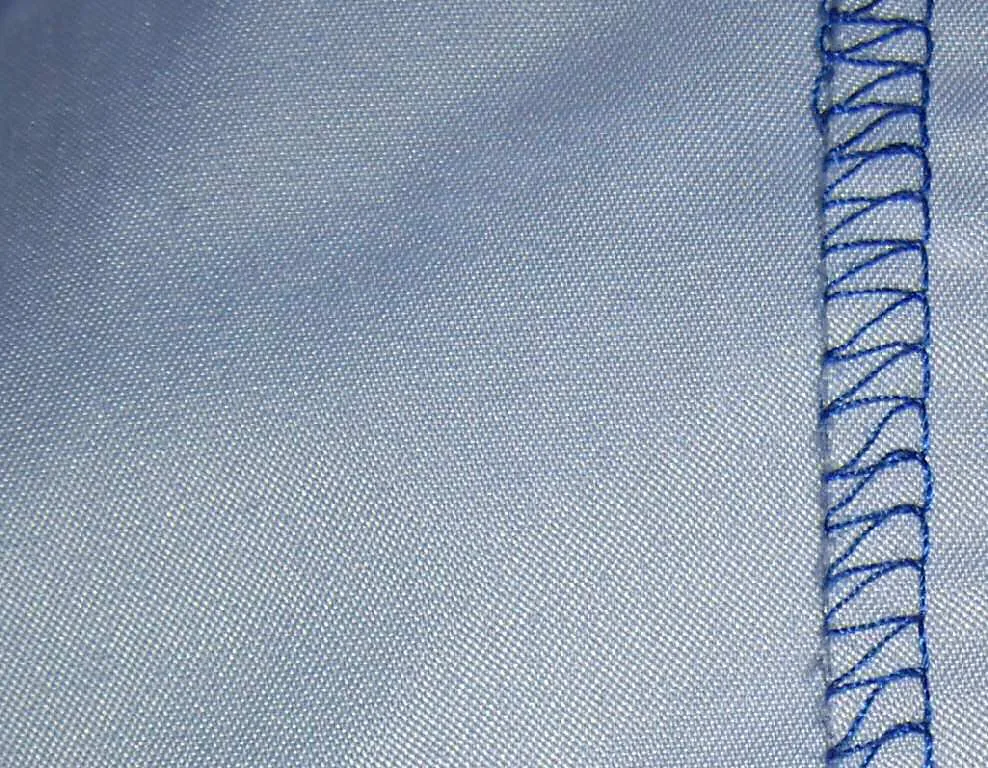
Step 5: Sewing is where structure becomes quality
After decoration, the plush body is assembled through industrial sewing and selected hand-finishing. Manufacturing guides describe sewing as the structural framework of the product, while noting that plush toys are especially demanding because of curved seams, layered fabrics, and alignment sensitivity. Lockstitch is commonly used for structural seams such as torso, legs, and head; overlock helps control raw edges and reduce fraying; zigzag stitching adds flexibility in curved or stretch-sensitive areas; and reinforced stitching is used in high-stress zones.
This leads to another important comparison:
- Machine sewing gives speed, repeatability, and structural consistency.
- Hand-finishing gives refinement, invisible closure quality, and better sculpting in premium areas.
Industry sewing guides highlight ladder stitch for closing stuffing openings invisibly, whip stitch for attaching small parts, and hand-sculpting stitches for shaping features such as cheeks or nose bridges. They also note that hidden seams, ladder stitching, and blind stitching are preferred for premium closures because poor closure work can distort shape and make the toy look visibly low-quality.
So when a plush buyer says a product “looks cheap,” the issue is often not the fabric alone. It may be the closure seam, seam tension, seam allowance, or the lack of hand-finishing in high-visibility zones.

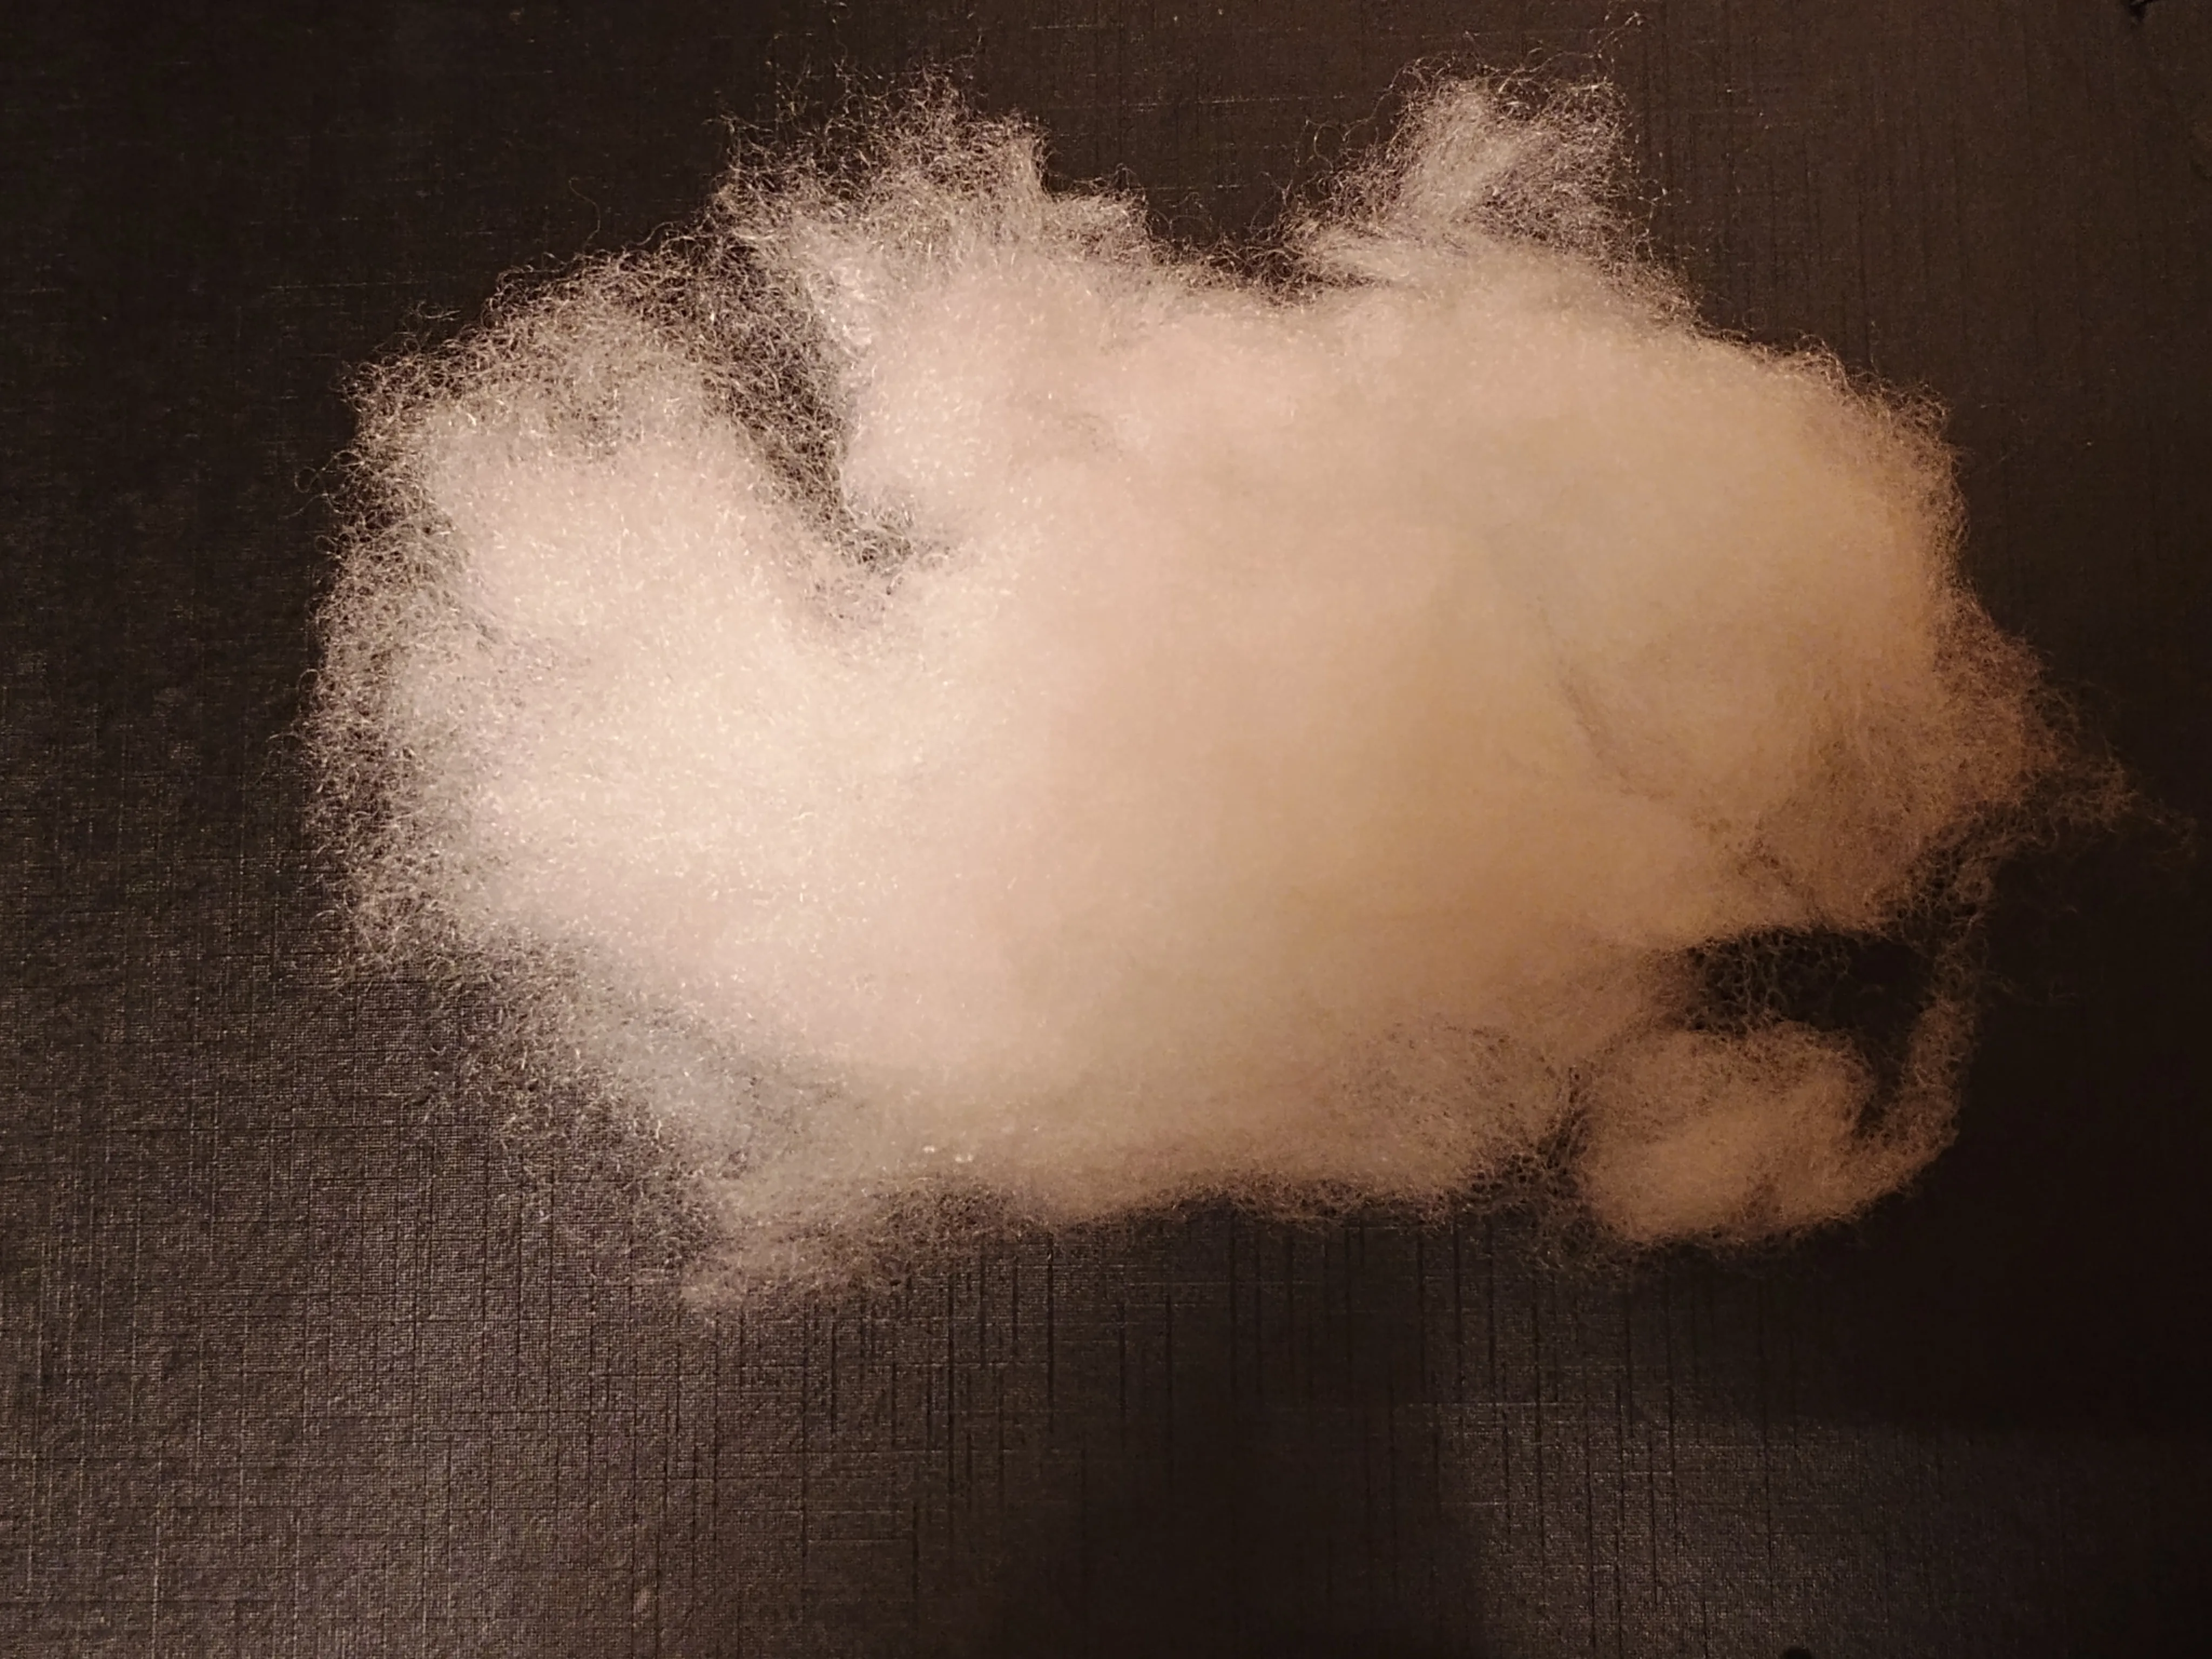
Step 6: Stuffing and shaping create the emotional feel of the toy
Stuffing is often treated as a back-end step, but manufacturing guides describe it as both an art and a science because it controls softness, firmness, balance, and overall silhouette. Factories may use different filling materials depending on project requirements, but what matters most at the process level is how the filling is distributed. Better factories fill the head, body, and limbs by zone, remove air pockets, use tools to push filling into complex areas, and then hand-shape the toy before closure.
This is where the next horizontal comparison becomes useful:
- Basic bulk filling is faster and cheaper, but often gives a more generic shape.
- Zone-by-zone filling plus hand shaping takes more control, but it produces a more balanced silhouette and a more premium tactile feel.
Factories also close the product using ladder stitch, blind stitch, or machine closure depending on design. The point is that stuffing is not only about “softness.” It is a structural decision that changes the final face, posture, balance, and perceived value of the plush.
Step 7: Export-ready QC is much more than a final visual check
When production is complete, professional plush workflows move into multi-stage QC. Process guides describe final checks against the golden sample for shape, size, color, embroidery accuracy, stitching strength, accessory attachment, and overall workmanship. Additional checks may include AQL-based sampling, seam or attachment tension testing, visual inspection for defects, and verification of safety-related components. Needle detection is then used to ensure no metal fragments remain from broken sewing needles before packaging.
For B2B buyers, this is the difference between “a factory that can sew plush” and “a factory that can ship plush globally.” QC frameworks in the plush sector increasingly formalize inspection with sampling rules and zero tolerance for critical defects, while high-control factories also treat needle detection as a standard safety gate rather than an optional add-on. Packaging then adds care labels, hangtags, barcodes, cartons, and export documentation that prepare the order for customs and retail.
The horizontal comparison buyers actually need
If you only remember one part of this article, make it this:
A plush toy is not one process. It is a process route.
The choices below change the outcome more than most first-time buyers expect:
- Embroidery vs printing: choose embroidery for crisp, tactile, simple features; choose printing for gradients and complex artwork.
- Manual cutting vs die-cutting vs computer-controlled cutting: choose based on flexibility, efficiency, and order scale, not on habit.
- Machine sewing vs hand-finishing: machine sewing builds consistency; hand-finishing raises perceived quality where the eye notices it most.
- Basic filling vs zone-shaped filling: both can fill a toy, but only one makes the toy feel intentionally engineered.
- Basic final inspection vs export-ready QC: if the factory cannot work against a golden sample, inspection logic, and needle-detection routine, the risk shifts back to the buyer.
Why process choices are also market-access choices
United States
CPSC states that all toys intended for use by children 12 years of age and under must be third-party tested and certified in a Children’s Product Certificate, and ASTM F963-23 became effective on April 20, 2024. CPSC’s own guidance also lists stuffing materials and stuffed and beanbag-type toys among the toy-specific sections that may require third-party testing, and products for children 12 and under must carry permanent tracking information on the product and packaging. For plush projects, this means the construction route, filling route, and labeling route all matter commercially.
European Union
The current EU toy framework requires toys to meet safety criteria covering general risks and specific risks such as physical and mechanical, flammability, chemical, electrical, hygiene, and radioactivity issues, and toys sold in the EU must carry CE marking. The new Toy Safety Regulation enters into force on 1 January 2026 and starts applying on 1 August 2030, and it will require a digital product passport accessible through a data carrier. That raises the bar not just for testing, but for how clearly materials, warnings, and compliance data are managed.
Australia
Australia’s mandatory standard for toys up to and including 36 months covers stuffed, plush, and flocked animals and figures, and the ACCC says these toys must comply with certain sections of one of several recognized standards, including AS/NZS ISO 8124.1, ISO 8124-1, EN 71-1, or ASTM F963-17. In other words, plush toys for younger children are not judged only on appearance — they are judged on design, construction, and testing.
Japan
JETRO’s import guidance notes that toys that may come into contact with the mouth for infants under 6 fall under Food Sanitation Act controls, and from December 2025 infant toys for children under 3 become regulated child-specific products that must comply with technical and age standards and carry the national PS mark. The Japan Toy Association also explains that its ST Mark program is built on the ST safety standard, with Part 1 and Part 2 aligned to ISO 8124 mechanical/physical and flammability requirements, while Part 3 remains based on Japan’s Food Sanitation Law. For plush exporters, that means textile choice, accessory choice, and intended age grading all have to be coherent.
Korea
For Korea, plush is not just a textile issue; it sits inside the child-product safety framework. KTR’s KC guidance lists toy under the child-product safety confirmation system and says manufacturers or importers must obtain safety testing from a designated body before release or customs clearance. KATS also explains that Korea’s product-safety certification schemes are mandatory and rely on testing — and for certain schemes, factory inspection as well — before products are delivered to market.
One more thing buyers should understand: textile safety claims are not the same as toy-law compliance
If your brand wants a stronger textile-safety story, OEKO-TEX® STANDARD 100 can be useful because it applies to textile products and accessory materials across all production stages, including recycled materials. OEKO-TEX says every thread, button, and accessory is tested against a list of more than 1,000 harmful substances, and Product Class 1 is the strictest class for babies and children up to 3 years. But OEKO-TEX is a textile harmful-substances label, not a substitute for US, EU, Japan, Korea, or Australia toy-law compliance. It strengthens your materials story; it does not replace toy testing and market-specific documentation.
What buyers should ask before approving the next plush project
Before you compare supplier quotes, ask these questions:
- What is the approved golden sample, and how is bulk matched to it?
- Which decoration method is being used for the face and why?
- Is cutting manual, die-based, or computer-controlled for this SKU?
- Which stitch plan is used for main seams, stress points, and closures?
- Is the filling controlled by zone, or just by total weight?
- What final QC steps happen before packing?
- Is needle detection part of the standard process?
- Which market-specific documents will support this order?
If a supplier cannot answer those questions clearly, the quote is probably not comparable yet. That is the real reason many plush projects go wrong after sample approval.
Conclusion
A plush toy is not premium because the concept art is cute. It becomes premium because the process route supports the concept all the way through production.
That is the real difference buyers need to understand. Material prep affects consistency. Cutting affects symmetry. Decoration affects visual language. Sewing affects structure. Filling affects shape and feel. QC affects whether the bulk order still looks like the approved sample. And export compliance affects whether the product can actually move into your target market without delay or rework.